![]()
Working with get_absolute_url in Django: What is get_absolute_url in Django?
Every resource (CSS files, images, HTML documents, etc.) on your hosting server must have a canonical URL so your Django website users can access it.
To do that, a user must have access to the URL that points to a resource or page on your website. For example, ngangasn.com/blog/1 will retrieve the resource of type webpage (blog post) with an id of 1.
If you are familiar with Django, you must create a view that retrieves the objects in your database, connect the view to a URL, and use that URL to retrieve the object.
After creating the URL, for example, ngangasn.com/blog/1, your users do not yet know the link to the resource. Thus, you may provide the new resource URL on your home page or in the navigation menu through a link.
You create clickable links in Django using <a> tags in your .html files, also known as templates.
You can pass the path to a resource in your templates like this:
<a href="/blog/{{ object.slug }}">{{ object.title }}</a>
OR
<a href="/book/{{ book.id }}">Book 1</a>This will still work; you or your users can access every single object.
However, the process of writing your templates code will be very tedious and repetitive.
You should prefer using a more conventional and easier way. Using the get_absolute_url() to calculate the URL for each resource automatically.
What is get_absolute_url in Django and its application
The get_absolute_url() method calculates the canonical URL of an object in your Django database. The method returns a string value for the unique field used in the URL over HTTP. An example of a commonly used field is the slug field.
A canonical URL is the preferred full URL of a resource available on your Django website hosting service. For example, when you have a Django blog available on the internet, Google prefers the canonical URL, yourdomainname.com/blog to index your blog posts.
Thus, https://ngangasn/working-with-django-templates is the canonical URL of this blog post that Google uses to index it.
The get_absolute_url method also works not only with blog posts but also with other real life objects implementation. Thus, whether you have Product, Student, Book, Category, e.t.c., models, you can use the get_absolute_url() to calculate unique URLs for each single object of these items.
Django get_absolute_url is an instance method you can implement in your Django project to create absolute URLs for your resources easily.
You create the get_absolute_url() method in your Django models.
Therefore, if you have a Student model class, you can retrieve a student object, where each student instance is stored in your Django database.
With each object instance retrieved, you have access to the instance method, get_absolute_url(), which you can use to calculate its canonical URL.
So, here’s how the get_absolute_url() method should work
- First, you retrieve the object instance from the database
- The object instance should have access to the instance methods defined within the model class where one of the instance methods is the user-defined get_absolute_url() method
- Upon calling the get_absolute_url() method, it calculates the canonical URL for the object and returns a string value containing a unique URL over the HTTP.
As the get_absolute_url() in an instance method, each object instance must be uniquely identified to calculate the correct unique URL.
Each object must be uniquely identified to avoid duplicate or MultipleObjectsReturned errors.
One way to uniquely identify objects in Django is to use id or slug fields. As a convention, you should use the slug field for your get_absolute_url method. Besides, URLs using slugs are more user and SEO friendly.
An instance method is the method accessible to instances of a class. Therefore, the method is created within a class taking self as one of its parameters. Here’s an example of an instance method:
class Robot:
    model = 'IG Unit'

    # instance method
    def hunt(self):
        return "I must hunt a Mandalorian!"

    # instance method
    def override_base_command(self):
        return "Now, I care and nurse baby Yoda"
Each object or more specific robot, has access to the hunt() and override_base_command() instance methods.
Now you understand why we create the get_absolute_url() function in your Django models.
Now, here’s an example implementation of the get_absolute_url() method in Django:
class Student(models.Model):
    first_name = models.CharField(max_length=255)
    last_name = models.CharField(max_length=255)

    def __str__(self):
        return f"{self.first_name}, {self.last_name}"

    # write your get_absolute_url instance method here
    def get_absolute_url(self):
        return f'/students/{self.id}'
This is a simple implementation of calculating the URL of each model object.
Based on how you define your get_absolute_url, you can use slug fields, primary keys, id, dates, etc., in your absolute URLs.
To do that, you can use the reverse method to define the fields you wish to include in your canonical URLs. Thus, you have the freedom to customize your absolute URLs in your Django application.
Here is an example canonical URL calculation that creates the following URL format: /year/month/day/object_slug/
def get_absolute_url(self):
    return reverse('post-detail',
                   args=[self.published.year,
                         self.published.month,
                         self.published.day,
                         self.slug]
                   )
The method above utilizes the reverse method that takes a named URL, post-detail, and supplies additional keyword arguments used to calculate a model object’s full URL.
The get_absolute_url code above returns a URL that looks like this: /2022/12/9/working-with-django/
Thus, we can create unique and user-friendly URLs using other model fields, such as date.
Why you would use get_absolute_url() in Django
- Create unique URLs for your model instances
- Use get_absolute_url() in templates and avoid hard-coding your objects’ URLs
- Avoid redundancy in the URL structure of your objects. Thus, you can avoid changing each URL for your objects in each place they are used in your Django project.
- When using class-based views such as CreateView and UpdateView, Django uses the get_absolute_url to calculate the URL of the successfully created or updated item. Upon creating or updating an item, the user is redirected to the detail page of that particular item using the calculated URL.
How URLs work in Django
Django provides tools for performing URL reversing that match the different places where URLs are needed:
- In templates: Using the
urltemplate tag. - In Python code: Using the
reverse()function. - In higher-level code related to the handling of URLs of Django model instances: The
get_absolute_url()method.
Using the url template tag and reverse functions in your views are ways to calculate URLs in Django. However, approaching URL calculation this way is more tedious and more manual.
When you want to update a URL for a particular URL, you must change every occurrence of the hard-coded URL in your code. Thus, you’d end up traversing through views and templates code to change a single URL.
Time consuming, right?
On that note, I forgot I had a date with my gorgeous girl. Huh! I was consumed into writing the code for this article.
Now she is distracting me with endless calls.
What’s that new message from ‘cupcake?’ ooh! “Have a nice life!”
But …
I gotta root for career over wimin!
Sorry, my date.
Gotta reschedule.
I gotta write this a-a-a atikooo. Me: snuffling with a LOVING heart, broken in two and probably 1 nanogram of a tear …
So, breakups doesn’t heart that much. Oooph!
Sorry, I am getting distracted.
I should probably get back to hard-coding my Django URLs
When you create web pages, blog posts, and API endpoints, absolute URLs are needed, especially in Django sites using the rest framework.
This approach is easier, faster, and maintainable.
Fortunately, creating absolute paths for your Django website resources is a straightforward process.
How to create get_absolute_url in your Django project
Here are the steps to create the get_absolute_url() method in your Django site.
Step 1: Locate the model that you want its objects’ URL calculated.
class Student(models.Model):
    first_name = models.CharField(max_length=255)
    last_name = models.CharField(max_length=255)

    def __str__(self):
        return f"{self.first_name}, {self.last_name}"
The reason for creating your Django get absolute url in your Django models is to allow the creation of URLs based on an instance of each object.
Thus, make your absolute URLs unique to each instance object in your Django application using a unique primary key or slug field.
Step 2: Create a new instance method in the model class and name it get_absolute_url().
Pass the self parameter to the function to make it an instance method.
class Student(models.Model):
    first_name = models.CharField(max_length=255)
    last_name = models.CharField(max_length=255)

    def __str__(self):
        return f"{self.first_name}, {self.last_name}"

    def get_absolute_url(self):
        ...
Step 3: Define how your URLs should be calculated
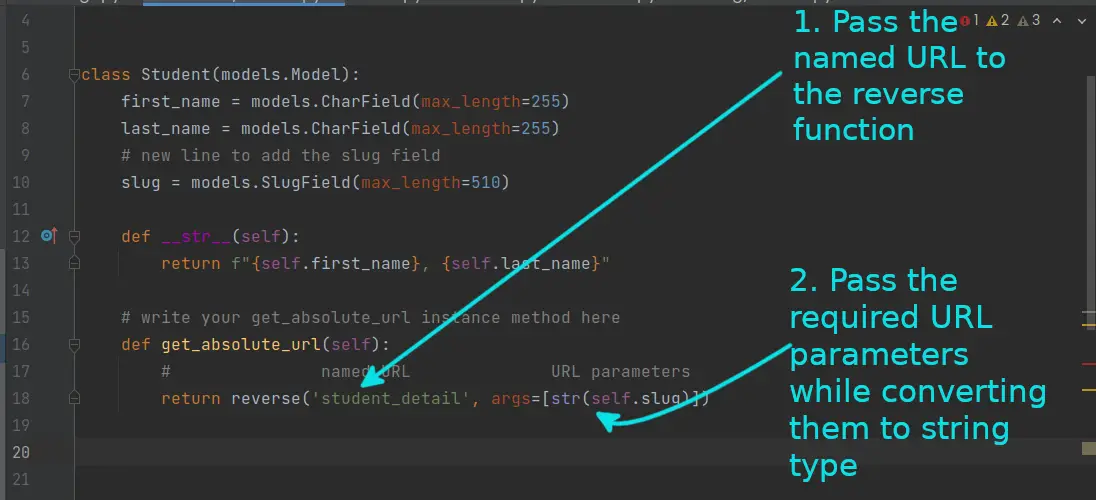
Inside the get_absolute_url() method, define the URL calculation used for the instance objects. As a convention, use the reverse method and a slug field to calculate the canonical URL.
First, import the reverse function from django.urls module
from django.urls import reverseBecause we didn’t have the slug field for the Student model, create it
slug = models.SlugField(max_length=510)
Finally, define your URL calculation using the reverse method
return reverse('student_detail', args=[str(self.slug)])Here, the reverse method takes a named URL and passes the self.slug string arguments when creating the URL of each object.
Note: get_absolute_url returns a string over HTTP. Thus, you should pass the keyword arguments as strings to the reverse method.
If you were using an id field, you would convert it the same way:
return reverse('student_detail', args=[str(self.id)])
So, your final get_absolute_url() method and model class should look like this:
from django.db import models
# import the reverse method
from django.urls import reverse


class Student(models.Model):
    first_name = models.CharField(max_length=255)
    last_name = models.CharField(max_length=255)
    # new line to add the slug field
    slug = models.SlugField(max_length=510)

    def __str__(self):
        return f"{self.first_name}, {self.last_name}"

    def get_absolute_url(self):
        return reverse('student_detail', args=[str(self.slug)])
Step 4: Use your get_absolute_url in templates
After calculating the URLs using the get_absolute_url method, you can reference these URLs in your templates. Thus, you can add the new URLs as links allowing you to have clickable link navigation.
Here’s how you use absolute URLs in Django templates.
<a href="{{ object.get_absolute_url }}">Object title/id/name</a>For our student model, you can create a link to each student like this:
<a href="{{ student.get_absolute_url }}">
    {{ student.first_name}} {{ student.last_name }}
</a>
NB: You should not call the get_abolute_url method in templates the way a method is invoked in Python.
Using object.get_absolute_url() will produce TemplateSyntaxError at … Could not parse the remainder: ‘()’ from ‘student.get_absolute_url()’ error
Therefore, you should call the get_absolute_url method in templates with no brackets.
Related Questions
How to use a slug in the get_absolute_url method in Django
Here are the different ways to use a slug field in your get_absolute_url method:
- Calculating the URL using a string while passing the self.slug
    def get_absolute_url(self):
        return f'/students/{self.slug}'

    OR

    def get_absolute_url(self):
        return '/students/%s/' % self.slug
2. Using the reverse method that takes the slug field as an additional keyword argument
def get_absolute_url(self):
    return reverse('student', args=[str(self.slug)])
OR
    def get_absolute_url(self):
        kwargs = {
            'slug': self.slug
        }
        return reverse('student', kwargs=kwargs)
The reverse method is the best and more conventional approach to calculating the canonical URL using the slug field of an object in Django.
How to use get_absolute_url in class-based views
When using class-based views in get_absolute_url, you should namespace your URLs and use these named URLs are keyword arguments in your reverse method. Thus, to implement class-based views URLs in the get_absolute_url() method, you must:
1. Created named URLs for the class-based view, such as the DetailView
urlpatterns = [
    # Example of a named URL
    path('<slug:slug>/', StudentDetailView.as_view(), name='student_detail'),
]
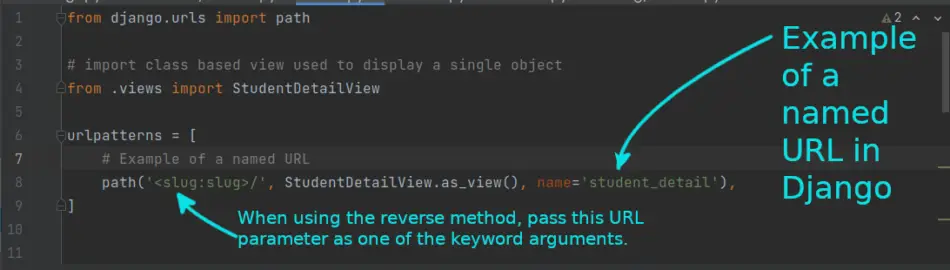
2. Pass the named URL to the reverse function with the required URL parameters
    def get_absolute_url(self):
        #               named URL              URL parameters
        return reverse('student_detail', args=[str(self.slug)])

That’s how you use get_absolute_url to calculate canonical URLs for class-based views.
Example project using the get_absolute_url and reverse methods
To summarise what you have learned, let’s create a simple Django blog project implementing named URLs with class-based views, instance method get_absolute_url, and reverse method.
Create a new Django project
Open a new Terminal window, navigate into the Desktop folder, and create a new folder for our new Django project.
You may create a Django project folder anywhere on your file system.
cd ~/Desktop && mkdir DjangoUni

cd ~/Desktop/DjangoUni
Create a new environment that you will use to install Django.
Use the command below if you already have a particular directory for all your virtual environment.
I use the ~/.virtualenvs directory to store all my virtual environments. Use your preferred directory.
python -m venv ~/.virtualenvs/DjangoUniEnvAfter creating the virtual environment, activate it and install Django.
source ~/.virtualenvs/DjangoUniEnv/bin/activate

pip install django
Create a new Django project in the same folder you created earlier. I used the Desktop/DjangoUni directory earlier.
cd ~/Desktop/DjangoUni

django-admin startproject djangoUni .
After successfully creating a new Django project, open the project’s folder with your favourite IDE or editor.
cd ~/Desktop/new_django_project && code .Create a new app and add it to your installed apps
Open the Terminal and type the following to create a new blog app:
python manage.py startapp blogAdd the blog app to your installed apps
INSTALLED_APPS = [
    "django.contrib.admin",
    "django.contrib.auth",
    "django.contrib.contenttypes",
    "django.contrib.sessions",
    "django.contrib.messages",
    "django.contrib.staticfiles",

    'blog',
]
Create a Django model named BlogPost
Define the properties and methods used for the instance of the object. Open the models.py files inside the blog folder and add the following lines of code:
class BlogPost(models.Model):
    POST_STATUS = (
        ('published', 'Published'),
        ('draft', 'Draft'),
    )
    title = models.CharField(max_length=100)
    slug = models.SlugField(max_length=100)
    body = models.TextField()
    publish_date = models.DateTimeField(default=timezone.now)
    created_on = models.DateTimeField(auto_now_add=True)
    updated_on = models.DateTimeField(auto_now=True)
    status = models.CharField(max_length=10, choices=POST_STATUS, default='draft')
After defining the models, you should run the makemigrations command to translate the above Python code into SQL statements.
Also, run the migrate command to make the changes persist in your database
Run the migrations by executing the following commands
python manage.py makemigrations

python manage.py migrate
Create the DetailView view to retrieve each blog post
from django.views.generic import DetailView

from .models import BlogPost


class BlogPostDetailView(DetailView):
    model = BlogPost
    template_name = 'detail.html'
Connect the class-based view to the appropriate URL
Create app-level URL configuration for the blog app by creating a new urls.py file inside the blop app directory
touch blog/urls.pyAdd the following lines of code to the /blog/url.py
from django.urls import path

from .views import BlogPostDetailView

urlpatterns = [
    path('<slug:slug>/', BlogPostDetailView.as_view(), name='post-detail')
]
Remember to create a named URL for the BlogPostDetailView view.
Besides, register the blog app-level URL configuration in your project-level URL configuration file, djangoUni/urls.py
from django.contrib import admin
# Add the following line to import include() function
from django.urls import path, include

urlpatterns = [
    path("admin/", admin.site.urls),
    # register the blog app urls here
    path('blog/', include('blog.urls')),
]
Create the get_absolute_url() in the BlogPost model class
Use the reverse function while passing the named URL used for a single article object. Besides, pass the slug field as the keyword argument for the reverse function.
Go back to the blog/models.py file and add the get_absolute_url() instance method to the BlogPost model class
#     new instance method code
    def get_absolute_url(self):
        from django.urls import reverse
        return reverse('post-detail', args=[str(self.slug)])
Your final BlogPost model class should look like this:
class BlogPost(models.Model):
    POST_STATUS = (
        ('published', 'Published'),
        ('draft', 'Draft'),
    )
    title = models.CharField(max_length=100)
    slug = models.SlugField(max_length=100)
    body = models.TextField()
    publish_date = models.DateTimeField(default=timezone.now)
    created_on = models.DateTimeField(auto_now_add=True)
    updated_on = models.DateTimeField(auto_now=True)
    status = models.CharField(max_length=10, choices=POST_STATUS, default='draft')

#     new instance method code
    def get_absolute_url(self):
        from django.urls import reverse
        return reverse('post-detail', args=[str(self.slug)])
Register your blog app to the admin. In the blog/admin.py file, replace the file with the following lines of code
from django.contrib import admin

# Register your models here.
from .models import BlogPost

admin.site.register(BlogPost)
Create a new superuser account and log in to your Django app admin page
python manage.py createsuperuserAccess the following page, http://127.0.0.1:8000/admin/blog/blogpost/add/, and create a few blog posts
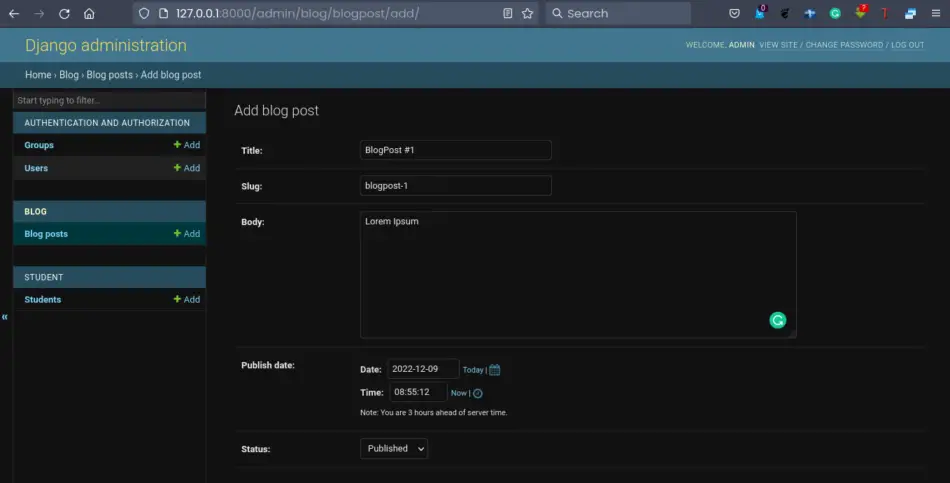
We have not created the templates for displaying each blog post on a web page.
Create a new app-level templates directory for the blog app.
mkdir blog/templatesInside the app-level templates directory, create a new file called detail.html. Use the name of the HTML file as one defined in your view.
touch blog/templates/detail.htmlAdd the following lines of code to the detail.html file
<!DOCTYPE html>
<html lang="en">
<head>
    <meta charset="UTF-8">
    <title>{{ object.title }}</title>
</head>
<body>
    <h1>{{ object.title }}</h1>
    <p>{{ object.body }}</p>

    <a href="{{ object.get_absolute_url }}">Article link</a>
</body>
</html>
Easy peasy!
Open the URL, http://127.0.0.1:8000/blog/blogpost-1/, and you should be able to view the blog post with its URL absolute URL (with the domain name).
For the development server, the domain should be localhost. However, when you deploy your Django web application and use a custom domain name, the URLs should include the domain name automatically.
That’s it
Cut! Cut! Cut!
Me: Producer, uh … Editor … It was an article- not a play
Me: I am firing you!
Editor: Steve [pauses], what did you say?
Me: Nothing, mate. I mumbled.

