![]()
Do I need to know HTML and CSS to learn Python Django?
This article has affiliate links at no cost to you!
As a Python Django web developer, you must use HTML and CSS if you will deal with the frontend part of your web applications.
On the other hand, you may not need to know HTML and CSS when you’re purely a backend Python Django developer.
In that case, if you will probably deal with designing the web pages of your Django web application in the future, you will need to use HTML and CSS.
So, you need to know HMTL and CSS if you use Django for full-stack web development. That means you will use Django as a backed technology and HTML and CSS to write and design the HTML pages.
Let’s see how you will use HTML and CSS if you use Django for full-stack web development (backend and frontend web development).
Do I need to know HTML to use Django?
As a full-stack Python web developer, you should know how to write markup language, HTML.
When structuring the content of your Django web pages, e.g. home page, you will need to use HTML to write the tags and elements that make up these web pages. Every web page on a website will need one of these elements: paragraphs, headings, links, e.t.c. HTML plays a major role in defining such elements in a Django web application.
Other uses of HTML in a Django web application are:
- Writing navigation links for internal resources of the web application and links to external resources of other websites.
- Embedding images and videos from different sources such as YouTube, Vimeo, e.t.c
- Create and organize web documents
- Improves Browser storage leading to the realization of offline browsing
- It acts as a skeleton for every web page on the internet
So, yes. You will need to learn HTML if you are going to include elements, such as images/videos, paragraphs, and headings on your Django websites. Besides, you will need to use HTML when creating web pages with offline browsing, image/video embedding, and internet navigation capabilities.
Do I need to know CSS to use Django?
CSS is another technology that is essential for full-stack Django developers.
You will need to know CSS to use Django for full-stack development because:
- CSS formats your Django website’s HTML documents/web pages to have a nice look and layout.
- CSS is the technology used to achieve the responsive capabilities of a website’s pages and images. Thus, your web pages will look nice on every device and screen size with CSS.
- CSS enhances the interactivity of a web page by controlling effects and animations.
Combining the capabilities of HTML and CSS technologies on a Django application helps in realizing a functional website with well-designed, animated, and well-formatted web pages.
HTML and CSS help present information by Django to the user in a more aesthetic manner.
If you have never worked with HTML and CSS, you must know that there are a lot of tutorials out there on there. While it is good to have these tutorials, it can take a long time to learn from all of them and consolidate the necessary skills required for a professional Django full-stack developer.
Because of that, I will give you the best Django course that will incorporate HTML and CSS to make you a high-demand professional developer.
With my expertise in Django, HTML, and CSS, I can confidently say that this course will equip you with the knowledge and skills you need to become a highly sought-after professional developer in the field.
Here it is:

Django 4 and Python Full-Stack Developer Masterclass
Whether you are struggling with creating responsive and dynamic Django websites or connecting your Django web app to an SQL database, this course is for you.
First, you’ll learn the basics of HTML and CSS, essential for creating static elements and stylish, responsive layouts with Bootstrap.
Then, you’ll dive into Django, mastering the essentials of function and class-based views, the powerful Django Template Language, and Django Models for interacting with your SQL backend.
With this course, you’ll have all the tools necessary to create professional-grade Django web applications that look great and work flawlessly.
So why wait? Enroll today and start your journey toward becoming a successful Django developer!
Can you use Django with HTML and CSS?
Django web framework is very flexible, allowing you to integrate it with HTML and CSS easily.
Django implements an efficient strategy that dynamically creates web pages for end-users. These web pages called Django templates, use the HTML markup language to generate the document that contains data that Django dynamically generates.
Later, you may use CSS to style these Django templates.
It is very easy to use Django with HTML and CSS.
As you are free to use HTML and CSS with Django, what is the best learning strategy to use so that you understand and know how these technologies merge to realize a web application?
Should I learn HTML and CSS before going into Django?
The best learning strategy to use when understanding how Django, HTML, and CSS integrate is to learn HTML and CSS first.
Learning HTML and CSS will help you understand
- how the web works,
- how web pages are created,
- how URL or links in a website works, and
- how pages are styled.
Also, HTML and CSS are among the easiest technologies to learn compared to Django.
If you have never used Python or Django in the past, you should probably start with HTML and CSS.
After you have mastered the art of creating web pages, styling them, and hosting them as static websites, you may now start to learn Python.
Later, you dive right into learning Django, and it should be easy to understand how web pages written using HTML and CSS are used for frontend web development and Django for backend development.
To understand how Django works with HTML and CSS, I will show you how to create a Django project, HTML templates, and a fully functional, simple one-page website.
For in-depth information on how to be an effective full-stack Python/Django web developer, check out this resource.
Setting up a Django project and using HTML and CSS
Django is a Python web framework. Thus, we will need to install Python first, create a virtual environment, install Django in the new virtual environment, and then create a new Django project.
Install Python
Open the Terminal and type the following to install the latest version of Python.
sudo apt update && sudo apt install python3

sudo apt install python3-pip virtualenv
Confirm that you have installed Python successfully by executing the following:
python3 –version
The command above should display the Python version installed on your system.
That confirms that Python is installed on your Linux system. These commands work on Debian operating systems that use apt as the package manager, such as Ubuntu, Kali Linux, e.t.c.
Find more information on how to install and use Python on Debian Linux in this article: How to install Python on Kali Linux.
After installing Python, create a separate directory on your home page to store all your virtual environments.
In this case, we will create a virtual environment in the home {~/) folder of the Linux system.
To do that, open the Terminal and type the following:
mkdir ~/.virtualenvs
The command above creates a new directory called .virtualenvs in your home (~) directory.
You will use the directory to store different virtual environments for your Django projects.
Create a virtual environment
After creating the designated directory for all of your Python virtual environments, create a new virtual environment by typing and executing the following:
python -m venv ~/.virtualenvs/SimpleDjangoWebsiteEnv
The command above creates a new virtual environment called SimpleDjangoWebsiteEnv inside the ~/.virtualenvs directory.
After creating the virtual environment, you need to activate it to install Django.
To do so, open the Terminal and execute the following command to activate the virtual environment:
source ~/.virtualenvs/SimpleDjangoWebsiteEnv/bin/activate
Install Django
After activating the virtual environment, you may install Django by typing:
pip install django
The command above installs Django version 4.0 in the virtual environment that we activated.
To specify a specific version of Django that you want to install, use the double equal sign (==) after the keyword django.
pip install django==4.0
You have successfully installed Django in a virtual environment.
Create a new Django project
Each Django project should have a separate directory.
Create a new directory to store your Django project files.
You may create the folder anywhere you want on your file system.
mkdir ~/Desktop/SimpleDjangoWebsite
Navigate into the Django project’s folder
cd ~/Desktop/SimpleDjangoWebsite
and create a new Django project
django-admin startproject simpleWebsite .
Open the project directory using your favorite IDE or code editor. If you get some errors serving your Django websites locally, check this article.
Using HTML with Django
Using HTML with Django involves adding a template to a view, creating the actual .html file, and instructing the view to return the template whenever a user accesses the URL associated/connected to the view.
Django Views are used in creating web pages, while URLs are used to create links that will be available for your website users to access.
This article provides more information about views and how they work.
So, a Django view uses an HTML template to render the information to a user.
Let’s create a new view for the home page of our Django project.
Create a new file called views.py inside the project’s configuration directory.
The project configuration directory is the folder that has the settings.py file. In this case, the simpleWebsite folder.
touch simpleWebsite/views.py

After creating the views.py file, let’s define a new view that uses an HTML template with a simple message whenever a user accesses the home page of our website.
Add the following code to the simpleWebsite/views.py file:
from django.shortcuts import render


def home_page(request):
    template_name = 'index.html'
    context = {'message': 'Meow Meow'}
    return render(request, template_name, context)
Here we are importing the render function in the first line and creating a new view that we’ll use for the home page of our simpleWebsite Django web application.
What is the use of the render() function?
render() is one of the most useful functions when creating dynamic web pages in Django.
Django render() function combines a template with a context dictionary to return an HttpResponse object that contains the rendered text in the context dictionary.
Besides text, you can use dynamic data from the database in the Django HTML template.
So, in our view, we are returning the text ‘Meow Meow’ using a template variable called message.
Django template variable holds a value that can be used in the HTML template. When Django encounters the variable, it evaluates it and displays that variable’s value on a web page.
Next, we use an index.html file to return a simple message whenever a user accesses the home page of our website.
Let’s create the file.
Before we create the index.html file, we need to specify the directory in which Django will look for new template files used in our Django web application.
Create a templates folder inside the project’s root folder – directory with the manage.py file.
mkdir templates
We need to instruct Django to include the new templates folder so we can use the index.html template in our home_page view.
Open the project’s settings file inside the project configuration folder.
Inside the settings file, find the line of code inside the TEMPLATES variable that looks like this:
'DIRS': [],Replace the line with the following line:
'DIRS': [BASE_DIR / 'templates'],Here, we are configuring Django to include the templates directory when rendering templates.
Your setttings.py file’s TEMPLATES variable should look like this:
TEMPLATES = [
   {
       'BACKEND': 'django.template.backends.django.DjangoTemplates',
       'DIRS': [BASE_DIR / 'templates'],
       'APP_DIRS': True,
       'OPTIONS': {
           'context_processors': [
               'django.template.context_processors.debug',
               'django.template.context_processors.request',
               'django.contrib.auth.context_processors.auth',
               'django.contrib.messages.context_processors.messages',
           ],
       },
   },
]
Inside the templates folder, create a new file and name it index.html. This is the file that the home_page view will use.
touch templates/index.html Open the file and add the following HTML code:
<!DOCTYPE html>
<html lang="en">
<head>
    <meta charset="UTF-8">
    <meta http-equiv="X-UA-Compatible" content="IE=edge">
    <meta name="viewport" content="width=device-width, initial-scale=1.0">
    <title>Simple Django Website</title>
</head>
<body>
    Hello, {{ message }}
</body>
</html>
The code is just HTML code. Inside the body tag, I have used the template variable, ‘message’, to display the variable’s value on an HTML template without manually entering the message.
{{ message }} is the syntax used for a Django template variable.
After creating the file, we need the URL (link) that a user will use to access the home page of our website and make a request to the home_page view.
For that reason, we need to connect the home_page to a new URL.
This article provides more information on how views and URLs work in Django.
Open the main project urls.py (simpleWebsite/urls.py) file and add the following lines of code:
from django.contrib import admin
from django.urls import path

# new line - import the view from views.py file
from .views import home_page

urlpatterns = [
    path('admin/', admin.site.urls),
    # new line - connect the home page url (/) to the home_page view imported above
    path('', home_page, name='home'),
]
Here, we are importing the home_page view and connecting it with the home page URL (an empty string) using the path function.
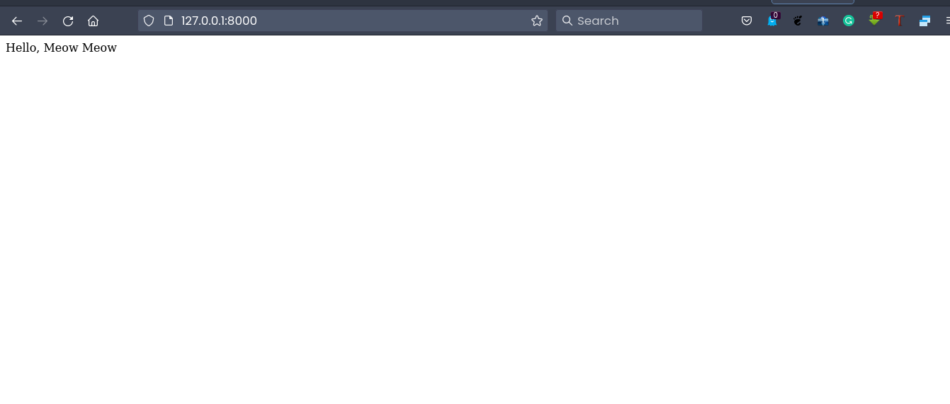
And voila!
You should see the message we used inside our Django view. Note that Django uses the index.html file.
And that is how easy it is to use HTML in Django.
Next, let’s see how easy it is to use CSS in our Django index.html template.
Using CSS in Django templates
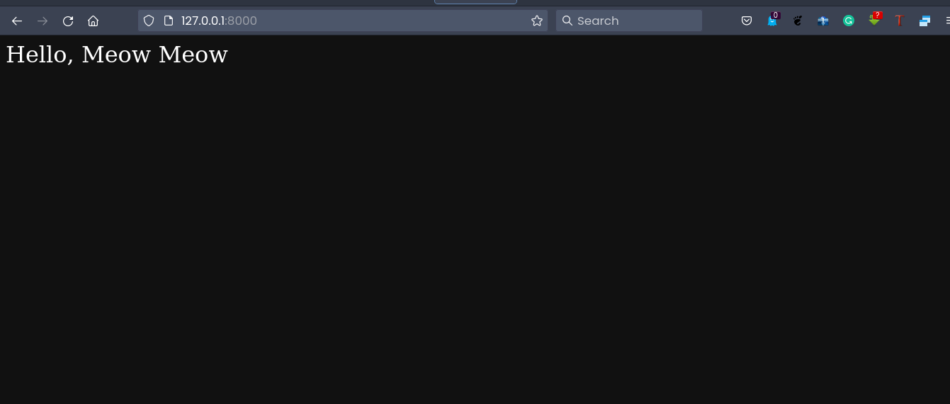
You may use CSS to style Django web pages in the same way you would use them in a normal .html file. We can define the CSS style attribute in our Django HTML templates using the <style></style> tags.
Let’s style the body of our Django index.html template to have a dark background and white text.
Open templates/index.html and add the following lines under the last meta tag:
    <style>
        body {
            background-color: #111111;
            color: #ffffff;
            font-size: 2rem;
        }
    </style>
So, your final index.html file should look like this:
<!DOCTYPE html>
<html lang="en">
<head>
    <meta charset="UTF-8">
    <meta http-equiv="X-UA-Compatible" content="IE=edge">
    <meta name="viewport" content="width=device-width, initial-scale=1.0">
    <style>
        body {
            background-color: #111111;
            color: #ffffff;
            font-size: 2rem;
        }
    </style>
    <title>Simple Django Website</title>
</head>
<body>
    Hello, {{ message }}
</body>
</html>
Reload the home page of our Django website and confirm that we have the new CSS styling.
Internal and inline CSS are the two most efficient ways to use when styling Django HTML templates.
Django HTML templates are just like any other .html file.
Therefore, you may style your Django templates using inline CSS that uses the style attribute inside the HTML elements and internal CSS that uses the style element in the head section.
Using HTML and CSS with Django is as easy as that. In addition, you may add plain JavaScript to add a little bit of animation on your Django web pages. Check this article to know whether JavaScript can be used with your Python/Django websites.
OR, Enroll in this course:
Django 4 and Python Full-Stack Developer Masterclass
First, you’ll learn the basics of HTML and CSS, essential for creating static elements and stylish, responsive layouts with Bootstrap.
Then, you’ll dive into Django, mastering the essentials of function and class-based views, the powerful Django Template Language, and Django Models for interacting with your SQL backend.
And that’s it for this tutorial. If you have any questions, be sure to comment.
See ya!

