Can a domain name have multiple IP addresses?

Sometimes, you may have purchased multiple servers from one hosting solution such as Digital Ocean or AWS, or from multiple hosting solutions.
And you think to yourself?
What if I could host my web application, whether a Django app or a WordPress website, on these multiple servers?
That way, if one of them fails, my users can be able to access my web application from a different site that is available.
So, if server 1 is down on Digital Ocean, then can users access server 2 on AWS or on a different server on the same Digital Ocean platform?
To achieve this, you would have to need a single domain name and multiple IP addresses from each server.
Can that be possible?
Can a domain have multiple IP addresses in its DNS records?
Well,
A domain name can have multiple IP addresses in its DNS configuration. Creating multiple A or quad A (AAAA) records for a domain name helps serve your website from different servers increasing availability and achieving efficient resource utilization.
So, when you have multiple IP addresses configured for your domain, the domain will resolve to different servers every time a user makes a request to access your website.
Here’s how it works:
- A user types in your domain name in their web browser
- The request is sent to the DNS resolver usually the user’s internet service provider (ISP) or network
- The DNS resolver receives multiple IP addresses from the DNS server for that domain name
- The resolver responds to the user with one of the IP addresses in a round-robin fashion
- That particular user accesses your website from the server IP addresses that the resolver responded with
- The next request that the user or another user accessing your website makes, they are directed to the next server with a different IP address
- The cycle keeps repeating in that round-robin fashion.
Having multiple IP addresses for a single domain name is called DNS Round Robin or DNS Load Balancing.
Let’s look into the details of what the DNS Round Robin technique is, its purpose, and how to configure a domain name using multiple IP addresses.
What is Round Robin DNS configuration?
Round Robin DNS configuration is a simple load balancing technique that happens at the DNS level.
The technique allows a single domain name, for example, ngangasn.com, to have multiple IP addresses in its DNS configuration.
The DNS load balancing helps distribute incoming traffic across multiple IP addresses where each points to a different server.
How does DNS Round Robin work?
The Round Robin works in a cyclical/rotating order, where the first request made to the DNS resolver responds with the first IP address, then the next request is directed to the second IP address until it reaches the last IP address DNS record.
Upon reaching the last A or quad A (AAAA) DNS record, it cycles back to the first IP address in the DNS configuration list.
So, if you have two IP addresses, the cycle goes from record one in the DNS list, then to the second record, then back to record one, and the cycle repeats infinitely.
- example.com IN A 192.168.1.100
- example.com IN A 192.168.1.101
- example.com IN A 192.168.1.102
If you have three IP addresses like the example configuration above, the cycle starts at the first IP address (192.168.1.100), then the second (192.168.1.101), then the third (192.168.1.102), and finally cycles back to the first IP address (192.168.1.100).
Here’s how it works on a real website.
A user makes a query for your domain, say example.com, using a web browser such as Chrome, as a client.
The client makes a DNS query for the domain name, example.com to get the IP address for the server to access the resources of your website.
The DNS resolver receives a list for all the IP addresses associated with that domain from the DNS server from the DNS server.
The DNS resolver responds to the client with the IP address that appear first in the DNS records.
The client is able to access the resources of the website, example.com, that are stored in the server associated with that IP address.
For the next new DNS queries, the DNS resolver will respond with a new IP address that appear subsequent to the first IP address in the DNS records.
Thus, for each subsequent DNS query for that domain will receive a different IP address until it cycles back to the first IP address record.
With such an approach, there is an effective distribution of traffic among the available IP addresses that point to different servers.
What is the purpose of the DNS Round Robin technique?
The main purpose of the round-robin DNS configuration is to achieve a basic load balancing by distributing traffic across multiple IP addresses associated with a single domain.
That way, you are ensured that your website availability and performance are at an all-time high most of the time.
Besides, you eliminate the need for complex load balancing.
Other benefits of having multiple IP addresses for a single domain are:
Why do websites have multiple IP addresses?
Websites do have multiple IP addresses for the main purpose of achieving a simple yet cost-effective load balancing that distributes traffic across multiple servers.
Having multiple servers serving a single website helps avoid overloading of a single server ensuring better performance and faster load and response times.
Other reasons why a domain name has multiple A or quad A (AAAA) records in its DNS configuration are:
- Achieve high availability by serving website resources from a different server if one of the servers ever goes down.
- You can scale the infrastructure of your deployment configuration to handle increasing traffic demand to your web application.
- Maintain service continuity and achieve high fault tolerance in case of any production environment failures or bugs.
How to Create a Round Robin DNS Entry: Configure multiple IP addresses for a domain
Here’s how to create DNS records with multiple IP addresses to achieve DNS round-robin load balancing which is essential for high availability.
Access the DNS management settings page provided by your domain name provider
Log in to your domain registrar’s website and access the DNS management page.
Examine the DNS records provided by your hosting provided to determine if they are A or quad A (AAAA) records
Determine whether you want to create a Round Robin entry for IPV4 (A records) or IPV6 (quad A records).
Add the multiple IP addresses using the Create or Add Record button
While ensuring you are editing the correct domain name, locate the “Add Record” or “Create A Record” button and press it to add your multiple IP addresses one at a time.
For IPv4 (A Records):
- Click on the “Add Record” or “Create A Record” button.
- In the “Name” field, enter the domain name or subdomain (e.g., example.com or subdomain.example.com). You can also use @ symbol.
- In the “IPv4 address” field, enter the first IP address you want to add.
- Click “Save” or “Add” to add the first IP address.
- Repeat the process to add more IP addresses under the same domain or subdomain.
For IPv6 (AAAA Records):
- Click on the “Add Record” or “Create AAAA Record” button.
- In the “Name” field, enter the domain name or subdomain. You may use @ symbol instead.
- In the “IPv6 address” field, enter the first IPv6 address you want to add.
- Click “Save” or “Add” to add the first IPv6 address.
- Repeat the process to add more IPv6 addresses under the same domain or subdomain.
Save the changes and wait for the record to propagate.
After adding all your IP addresses, click the “Save” button to save the changes you have made to your DNS records.
Wait for the DNS propagation to occur.
It can take a few minutes or hours.
Brew some coffee, mate!
How to add multiple IP addresses for one website on Cloudflare
Here’s how to create multiple IP addresses for one website using Cloudflare:
Step 1: Sign in to Cloudflare
Create a Cloudflare account if you don’t have one already.
Access the Cloudflare website and use the username or email address and password you used to create your account, log in to Cloudflare,
Step 2: Select the domain you wish to add DNS records
Once you are logged in, add your website’s domain name by pressing the “Add a site” button at the top.

If you have already added your domain name, select it.
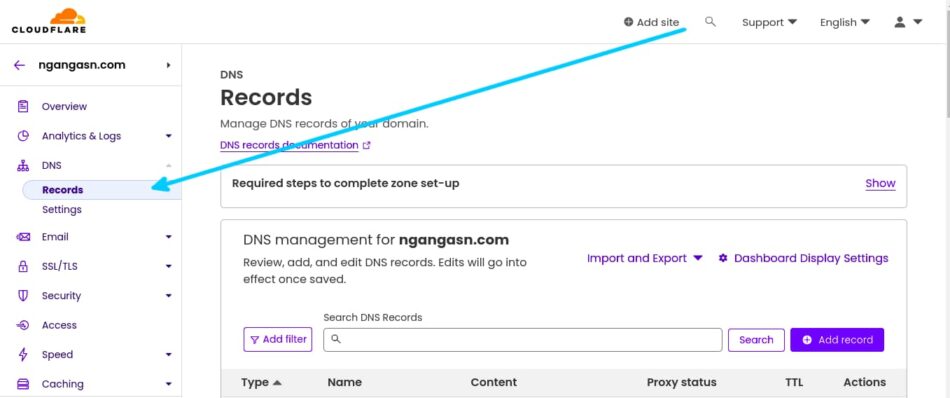
Step 3: Locate the DNS settings tab
Navigate into the DNS section tab.
Press it to collapse the menu and press “Records” to manage the DNS records for your domain.

Step 4: Add your A records (IPV4) or AAAA records (AAAA)
Depending on your hosting service provider, you may have IPV4 A or IPV6 AAAA IP addresses.
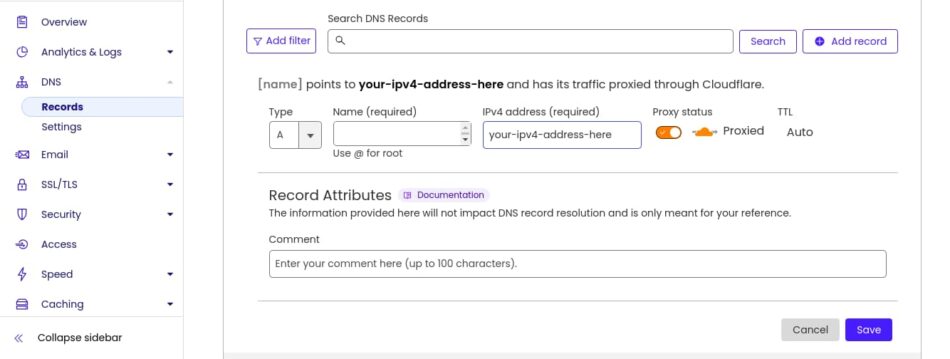
At the left side of your Cloudflare DNS management dashboard, locate the “Add record” button and press it to add either A or quad A records for your domain name.
For IPv4 (A Records):
- Click on the “Add record” button.
- Choose “A” from the record type dropdown (if it’s not already selected).
- In the “Name” field, enter the domain name or subdomain (e.g., example.com or subdomain.example.com).
- In the “IPv4 address” field, enter the first IP address you want to add.
- Set the proxy status.
- Click “Save” to add the record.

Repeat the process to add more IP addresses under the same domain or subdomain.
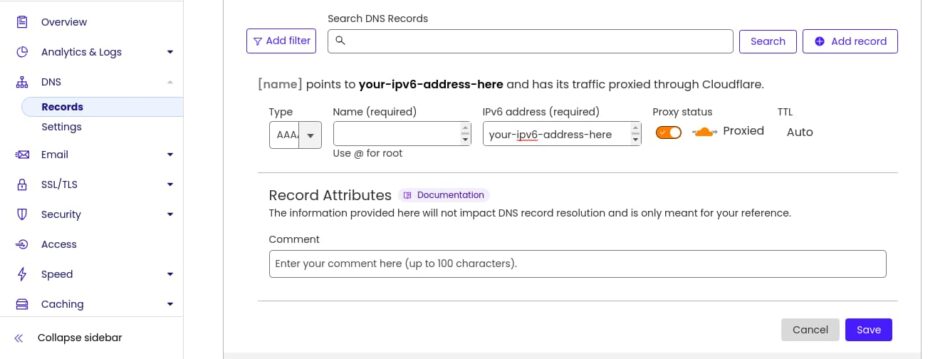
For IPv6 (AAAA Records):
- Click on the “Add record” button.
- Choose “AAAA” from the record type dropdown.
- In the “Name” field, enter the domain name or subdomain (e.g., example.com or subdomain.example.com).
- In the “IPv6 address” field, enter the first IPv6 address you want to add.
- Set the proxy status.
- Click “Save” to add the record.

Repeat the process to add more IPv6 addresses under the same domain or subdomain.
Step 5: Save the changes
Once you have added all your IP addresses for your domain name, press the Save button at the bottom of your Cloudflare DNS management interface.
Step 6: Wait for propagation to occur
DNS changes may take a few seconds to minutes to propagate, especially with Cloudflare, which is faster.
And that’s how you configure multiple IP addresses for your website using Cloudflare service.
… and that’s it!
I don’t have much more to say.
I think I have covered everything you need to know about having multiple IP addresses for a single domain name.
See ya!

