![]()
How to Take Screenshots on Linux: Does Linux have a snipping tool?

Screenshots are great ways to record information on your screen, whether on android, UNIX, Linux, or Windows devices. One common software/tool you may have used on Windows is the snipping tool.
When you may want to switch or have switched to Linux, you may wonder whether Linux has a snipping tool.
Linux does not have a snipping tool. Thus, you cannot take screenshots on Linux using the snipping tool as the tool is not available or installable on Linux operating systems. However, that should not stop you from taking screenshots because Linux offers great tools/apps such as gnome-screenshot and the gtk-vector-screenshot module that you can use to take screenshots in PNG, pdf, and SVG file formats.
A snipping tool is a tool only available on Windows operating system. Therefore, you will not find it on other operating systems, including Linux.
As Linux does not have the snipping tool, how can you take and record screenshots? Well, Linux provides better alternatives compared to the snipping tool available on Windows. With the Windows snipping tool, you are limited to only taking screenshots and saving them in one format. Besides, you do not get much functionality in customization.
How to take screenshots on Linux
On the other hand, Linux has great tools that allow you to take screenshots and save them in various other formats without using file converters. Some of these file formats that you can use to save your screenshots are:
- PNG format for image files that use minimum sizes without quality compromise
- JPEG format for image files
- PDF format for printable documents
- SVG format that is ideal for large screen devices, printing, and the web
How to take screenshots on Linux, which software is used to take screenshots in ubuntu,
You will get all these functionalities available on Linux whenever you want to record information on your screen without using additional hardware or applications. Another good thing is that you can do all that with only one application or method from a choice of these:
Gnome screenshot is a simple tool. However, you can do a lot with it in terms of taking screenshots on your Linux machine. For the GTK vector screenshot module, you have more advanced capabilities that allow you to save your screenshots in other file formats.
Let’s see in detail how these tools work.
Use Gnome Screenshot utility to take screenshots on Linux
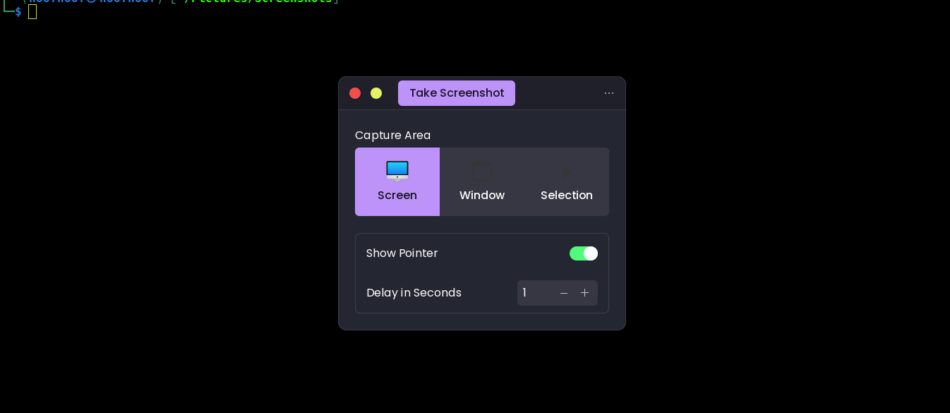
Gnome screenshot is a Gnome desktop environment screenshot utility that you can use to record screenshots on your Linux machine. Gnome Screenshot is a straightforward tool that you can use to use to take screenshots of a selection on your screen, a whole window, or the whole screen.
To use the Gnome Screenshot utility, you can open it from the apps list or search ‘screenshot’ in the apps list. Click on the app’s icon, and you should see a window like this.
However, you may find that you do not have it in your apps list. In that case, you can install Gnome Screenshot using the APT package manager.
How to install Gnome Screenshot utility on Linux
Follow these steps to install Gnome Screenshot on Linux:
Step 1: Open the Terminal
Press CTRL + ALT + T to open a new Terminal window. Alternatively, you may search ‘terminal’ and click on the app icon to open a new Terminal window.
Step 2: Update your Linux system
Type the following in the Terminal to update your system:
sudo apt update && sudo apt upgradeStep 3: Install Gnome Screenshot
After updating the system, type the following in your Terminal to install Gnome Screenshot:
sudo apt install gnome-screenshotStep 4: Open Gnome Screenshot by searching it in the Apps list
Click on the screenshot icon to open and start using Gnome Screenshot on Linux.
After you have opened the Gnome Screenshot utility, here’s how to take screenshots on Linux:
There are three options to capture screenshots in your Linux machine: the whole screen, window, or a selection.
- Capture a whole screen
- Capture the whole window
- Capture a selection / partial screenshot.
Take screenshots on Linux using the GTK Vector Screenshot module
The gtk-vector-screenshot module is another alternative you may use to take screenshots on Linux very fast. With the app installed, you can take screenshots off of a window. Therefore, you can easily take screenshots with the tool if you have a window open for a particular application or browser.
GTK Vector Screenshot module also offers you the ability to save your screenshots in other formats that include:
- PNG format (.png)
- PDF format (.pdf)
- SVG format (.svg)
- PostScript (.ps)
How to take screenshots on Linux using GTK Vector Screenshots
Here are the steps you need to take to record your screenshots on Linux using the gtk-vector-screenshot module:
Step 1: Open GTK Vector Screenshot app by searching it in the apps list and clinking on its icon
Step 2: Click on the “Take vector screenshot …” button to capture a window you wish to screenshot
You should see a simple window like the one provided below.
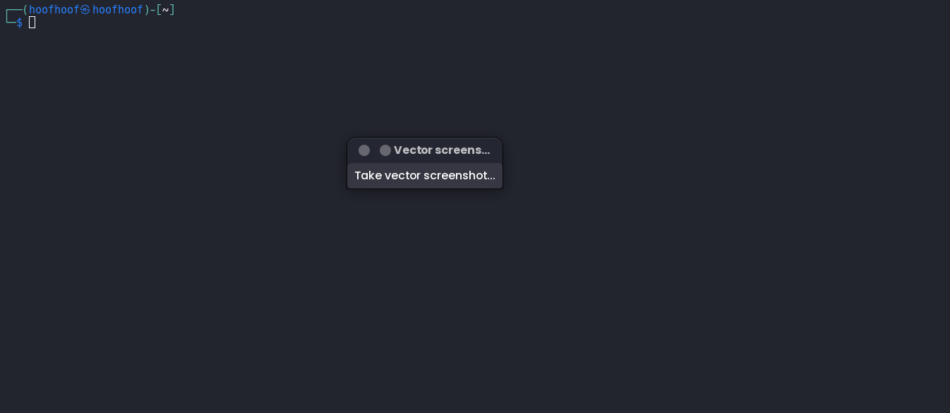
Step 3: Click on the window that you wish to record a screenshot
GTK Vector Screenshot should take a screenshot of the window that you clicked.
Step 4: Save your screenshot with the desired file format
After taking the screenshot, gtk-vector-screenshot should prompt you to save the screenshot using the file format you want. You can choose to save the screenshots in the .png, .pdf, .svg, and .ps file formats.
And that’s it. You can record as many screenshots as you wish with the tool.
How to install GTK Vector Screenshot on Linux
You can install the gtk-vector-screenshot module on Linux using the apt package manager. The installation method is easy and requires a few steps. Follow these steps to install the GTK Vector screenshot module on Linux.
Step 1: Open the Terminal
Press CTRL + ALT + T to open a new Terminal window. Alternatively, you may search ‘terminal’ and click on the app icon to open a new Terminal window.
Step 2: Update your Linux system
Type the following in the Terminal to update your system:
sudo apt update && sudo apt upgradeStep 3: Install GTK Vector Screenshot
After updating the system, type the following in your Terminal to install gtk-vector-screenshot:
sudo apt install gtk-vector-screenshotStep 4: Open GTK Vector Screenshot by searching it in the Apps list
Click on the vector screenshot icon to open and start using the GTK Vector Screenshot module to take screenshots on Linux.
On Linux, you can do all your screenshot recordings with Gnome Screenshot or GTK Vector Screenshot module. The best thing about them is that you get the functionality you would get from a snipping tool and more.
Use function keys combination to take screenshots on Linux
Another way to take screenshots on Linux is to use shortcut keys. To easily take screenshots on Linux, you may use the function key (fn) + PRTSC and use the dialog popup to take your pictures. The screenshot shortcuts allow you to record your screenshots without manually opening a tool or application.
You only need to press a combination of keys on your keyboard and select the area or window you may want to screenshot.
Here is a list of keyboard shortcuts to use on Linux to take screenshots easily:
Where to find screenshots files on Linux
When taking screenshots with gnome-screenshot on Linux, you will find your screenshot images stored in the Screenshots directory. The Screenshots directory is located in the /home/username/Pictures folder. Type the following on your Terminal to navigate into the directory or use the File Manager.
cd ~/Pictures/Screenshots && nautilus .A new Nautilus File Manager window should appear, showing the screenshots you have ever taken.
If you do not find your screenshots in this directory, you should also look in the pictures directory located in your directory. Type the following on your Terminal to navigate into the directory or use the File Manager to find the directory:
cd ~/Pictures/ && nautilus .How to edit screenshots/images on Linux
After taking your screenshots, especially in image file formats, you may need to edit them. For example, you may want to crop the screenshots. Fortunately, Linux has a powerful image editing tool comparable to or maybe more advanced than Photoshop, GIMP. GIMP is as good as Photoshop because it allows you to edit your images properly and efficiently. Besides, it is customizable, and you can set it up to have a look and feel like that of Photoshop.
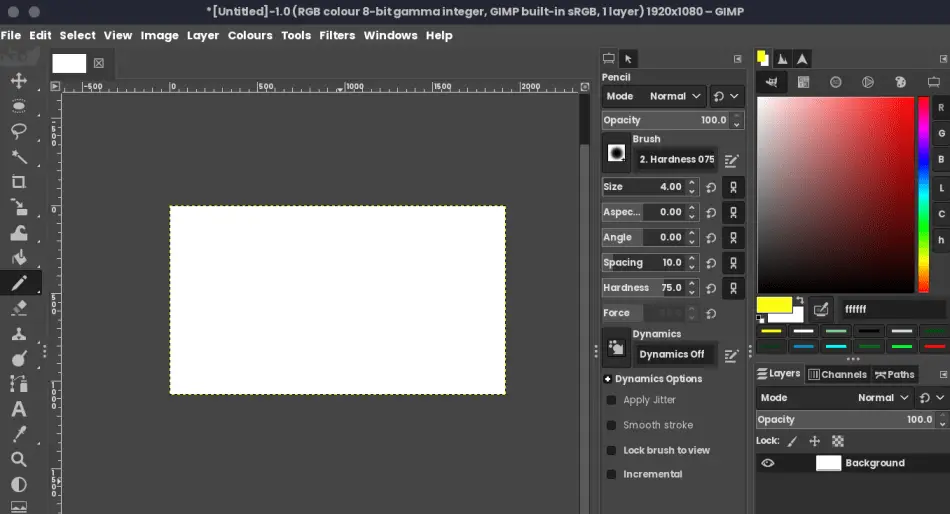
GIMP is a powerful image editing tool that you can use to edit your screenshots on Linux. GIMP offers you image editing and retouching, cropping, conversion of images into various formats, and free-form drawing features.
How to crop a screenshot in Linux using GIMP
Open the screenshot you want to edit using the GIMP tool available in the apps list. Alternatively, you may use File open with the option to open the screenshot.
After opening the image, click on Tools > Transform Tools > and select Crop. You can use the Crop tool to crop your screenshots.
An easier way to access the crop tool in GIMP is to press SHIFT + C and start cropping your images on Linux.
If you do not have GIMP in your Linux system, here’s how to install it.
How to install GIMP on Linux
Open the Terminal and run the following commands to update your system:
sudo apt update && sudo apt upgradeExecute these commands to install GIMP on Linux:
sudo apt install gimpRelated Questions
How to take a screenshot using the Linux Terminal
You can take screenshots using the Linux Terminal by typing the following:
gnome-screenshotBesides, you have other options, such as taking a screenshot of an entire screen, an application window, or selecting an area on the screen. Here’s how to take full and partial screenshots on Linux using the Terminal:
Screenshot an app window:
gnome-screenshot -wScreenshot an area on the screen:
gnome-screenshot -aScreenshot and store the image to the clipboard:
gnome-screenshot -cHowever, you must install the Gnome Screenshot utility to take screenshots using the Terminal. If you do not have Gnome Screenshots, you may type the following command or search the internet for a way to install it.
sudo apt update && sudo apt upgrade

sudo apt install gnome-screenshot
Which is the easiest way to take a screenshot on Linux
The easiest and quickest way to take screenshots on Linux Terminal is to use shortcut keys. However, the shortcut keys may require you to have installed screenshot tools to use the key combos. Fortunately, Gnome Screenshot is a great utility to install if you want to use shortcut keys to take screenshots on Linux. So, if you want a quicker way to take screenshots on Linux, use Gnome Screenshots.
Conclusion
Although Linux operating system does not have the clipping tool present in Windows, it provides great tools and modules that can help you take and store your screenshots.
Besides, you have the freedom to take the screenshots how you want and store them in your preferred file format. If you are on Ubuntu, Kali Linux, or any other Linux operating system, you can have tools such as Gnome Screenshot and GTK Vector Screenshot to help you take screenshots of your screen.
And that’s it for this article.

