![]()
How to use .env files for local and production Django websites
Environment variables?
Well, today we’re going to talk about them: what they are, their importance, and how they are used in local and production Django websites.
What are environment variables?
Python environment variables are variables affecting how your Python application runs but are stored in a location that is different from where your Python code lives.
Python environment variables hide Django secret keys, database parameters, and other sensitive information used within your code.
The advantages of using Python environment variables with your Django applications
1. Environment variables eliminate the need to edit your source code
When using environment variables, you do not need to code constantly changing values into your code.
With time, the approach will become tedious as you will have to iterate through every instance where you have used these values.
Instead, you would use environment variables and use them across the different parts of your Django web application code.
Whenever you may want to change a particular value, you just need to change it in one place – in the .env file.
The changes you make will reflect across every instance that you have used that particular variable.
2. Environment variables provide a secure way to store secret values
Environment variables are stored outside the Django application code.
Thus, it would not be readable to everyone that has the source code for your application.
3. Prevent exposing valuable/sensitive information through public or private remote commits
Another strategy that keeps your Django secret values secure is to avoid committing your code with sensitive information to the public.
When you use sensitive information in your Django code and commit them to a public or remote repository, everyone that has access will be able to view your secret values.
However, when you use environment variables, it is only you and your Django application that has access to these values.
However, when working with a local environment, you should avoid committing the .env file containing your secret values to a remote repository.
Be sure to add the .env file to the .gitignore file.
In your .gitignore file, add the following line:
.envA .env file is an environment file that you may use to store and manage all the environment variables your Django web application will use.
You may also use a .ini file to store your secret parameters.
Here’s how you create a .env file for your Django website:
Within the root directory of your Django project (the directory with the manage.py file), create a new file and name it .env
touch .envIf you are using Git, create a .gitignore file if you don’t have it.
touch .gitignoreAdd the following line to your .gitignore file:
.envBy adding the .env line to your .gitignore file, you make sure you do not commit your .env file with sensitive information to the remote git repository.
Now, add all the sensitive information such as Django secret key, database connection parameters, allowed hosts, debug status, email connection configurations, passwords, API connection parameters, and database URL in this file.
Here is an example:
SECRET_KEY=-=ffdkdutjf-x)xwq6q(dd!4mr91h4wdr#l=49psl=^dnw07x$j0^6&7bzzk
DEBUG=True
SITE_ID=1

DATABASE_NAME=my_db
DATABASE_USER=my_username
DATABASE_PASSWORD=my_db_1234
DATABASE_HOST=127.0.0.1
DATABASE_PORT=3306

EMAIL_PORT=587
After creating the .env file and adding your secret information, how do you use these values in your Django code?
Well, you may choose Python Decouple, Python Dotenv, and environs Python libraries to parse your Django environment variables.
I prefer to use Python Decouple.
Python Decouple is the best Python package for managing environment variables as it is very easy to use and compatible with the majority of PAAS websites such as Heroku.
To get started with Python Decouple, you just need to install the library in your Python environment (the environment you have Django installed) and import it wherever you use environment variables.
So, let’s say you have your Django project or create one. Find more information on how to create Django projects here.
python -m venv ~/.virtualenvs/DjangoWebsiteEnv

source ~/.virtualenvs/DjangoWebsiteEnv/bin/activate

pip install django

mkdir ~/Desktop/DjangoWebsite

cd ~/Desktop/DjangoWebsite

django-admin startproject simpleWebsite .
Here’s how you install and use Python decouple in your Django project.
How to install Python Decouple
Activate the Python environment and type:
pip install python-decouple
How to use Python Decouple with Django
Using Python Decouple in a local development environment and a live production website is very easy.
Basically, you import the library and retrieve the settings parameters using the config function.
Importing Python Decouple
from decouple import configRetrieving the values using the config function
DEBUG = config(‘DEBUG’, cast=bool)
Setting up environment variables in a local environment
In a local environment, you retrieve Django secret values stored in a .env file using Python Decouple’s config function.
However, before retrieving these values, you must ensure they are declared inside your .env file.
As we declared our environment variables in a .env file, here’s how you would retrieve the values in your settings.py file.
from decouple import config

SECRET_KEY = config('SECRET_KEY')
DEBUG = config('DEBUG', cast=bool)
DATABASES = {
   'default': {
       'ENGINE': 'django.db.backends.mysql',
       'NAME': config('DATABASE_NAME'),
       'USER': config('DATABASE_USER'),
       'PASSWORD': config('DATABASE_PASSWORD'),
       'HOST': config('DATABASE_HOST'),
       'PORT': config('DATABASE_PORT', cast=int),
   }
}
SITE_ID = config('SITE_ID', cast=int)
In the first line, we’re importing the config function and using it to retrieve the parameters stored in our .env file.
How to convert parameters to the right data type with Python Decouple
Python Decouple supplies Django settings values as strings by default.
Such a strategy could result in some data type errors when an integer or a boolean value is expected to be supplied in your Django code.
Therefore, Python Decouple allows the use of an additional argument within the config function called cast.
Casting allows you to convert the value supplied to Django settings to the right data type before using it.
How to convert parameters to Boolean data type
A boolean data type is ideal for setting debug status and other True or False values in your Django code.
For example, when deploying your Django website, you should turn off the error reports to avoid showing your site users the application’s errors.
Instead, you would turn off these errors by setting the DEBUG variable to False.
You may instruct Python Decouple to supply the environment variable as a boolean value to convert the DEBUG value to a boolean value.
Here’s how to do it.
In your settings.py file, set, DEBUG = config(‘DEBUG’, cast=bool)
Here, we’re setting the value of the DEBUG to be used as a boolean value, which is the required data type for turning off error reporting in Django.
How to convert parameters to integer data type
Integer data types are values in the form of numbers such as 1, 32, 78, 69, e.t.c.
Integers are widely used data types in Python Django as they are used as values for port numbers, primary keys, calculations, e.t.c.
Integers are ideal for storing port number values in Django project configurations.
These port numbers are used in database connection or email settings. For example, Gmail uses port 587 for connection.
To set up these connection ports, you must convert them into integers so that Django recognizes them to be valid when connecting to an email or database server.
With environment variables in use, you may instruct Python Decouple to convert the port values into integers using cast=int argument.
EMAIL_PORT = config(‘EMAIL_PORT’, cast=int)How to convert parameters to Boolean data type
There’s no need to convert parameters into strings as they are supplied to Django by default.
String parameters are ideal for hosts, email addresses, database names, Django secret keys, and IP addresses.
Setting up environment variables on a production environment / live website
With Python Decouple, you do not need to create a new .env file or upload the one you’re using for local development on PAAS sites or shared hosting servers.
Python Decouple will automatically extract the configuration parameters from environment variables set with a graphical interface such as cPanel.
Python Decouple will use the appropriate values in Django settings from the parameters set.
The difference between setting environment variables in a local environment and a production environment with PAAS sites or cPanel:
You must use a .env file in a local environment, while a .env file is not required in a production environment.
Let’s see how you use Python Decouple with the various deployment services and PAAS sites for a production environment.
Set up environment variables for a Django website on Heroku or PythonAnywhere
PAAS sites such as Heroku or Pythonanywhere do not require you to upload or create a new .env file to use environment variables in your Django application.
Heroku and other PAAS sites provide an interface where you can set your environment variables without using a .env file.
Here’s how you create environment variables for your Python Django application on Heroku:
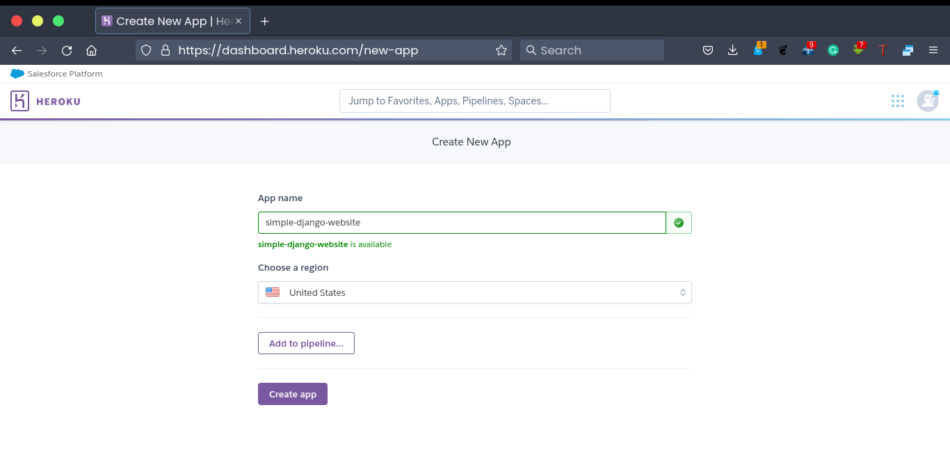
Login to your Heroku Dashboard.
Access the apps page and select your Django app. Otherwise, create a new app.
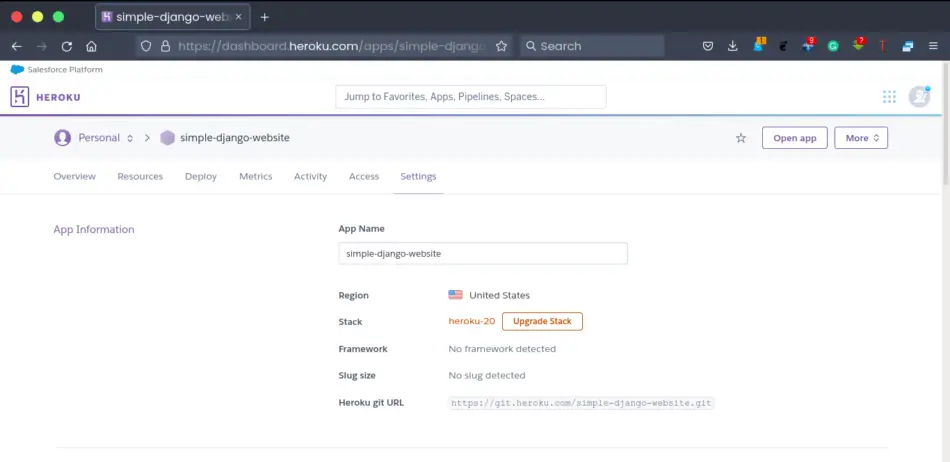
On the app Dashboard, access the settings tab on the right.
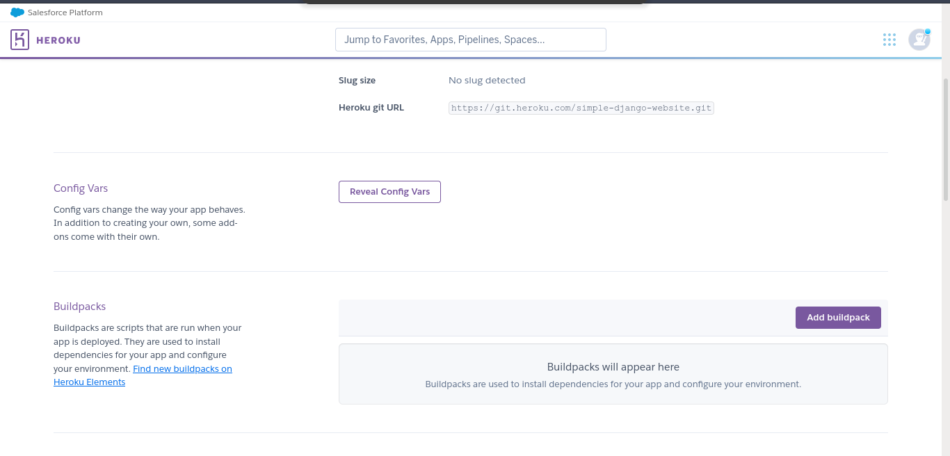
Scroll down until you see the reveal config vars of your app. Here’s where you declare the environment variable of your Python Django app.
Start adding the environment variable name on the left and its value on the right. Just the say way you add key-value pairs.
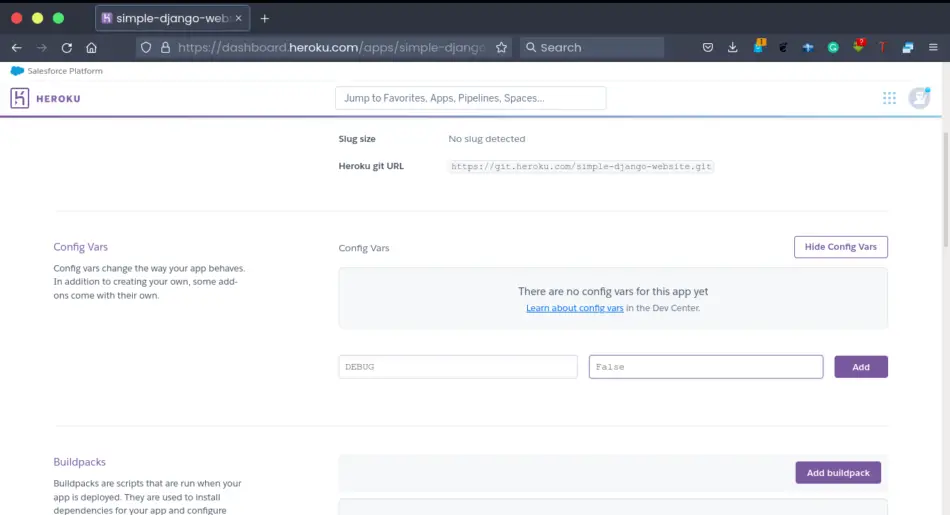
Press add after you finish adding the value.
Add all the environment variables for your Django web application.
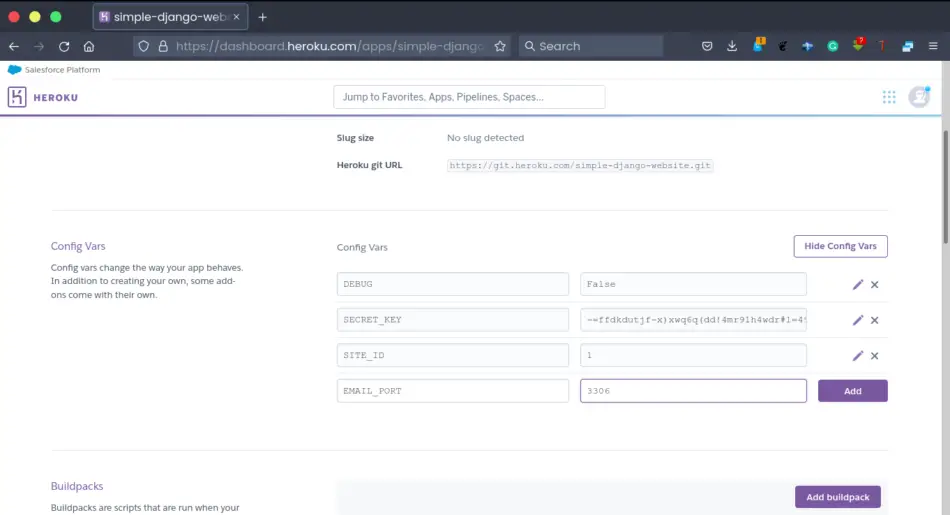
That is all you will need to configure your environment variables on Heroku.
Python Decouple will automatically retrieve these variables without having to configure anything else.
Go ahead and test that your application is working.
Set up environment variables for Django website on AWS EC2 Ubuntu server or VPS server.
When setting up environment variables for an Ubuntu server hosted on AWS or any other VPS provider, you will need to create a .env file in the location where you have your Python Django project files.
However, you should not commit your .env file when pushing your code to a remote repository and then using Git to pull the code to your Ubuntu server.
Instead, create the file when you’re logged in to your server instance using SSH.
Just type nano .env when you’re navigated into your Django project directory and start adding the environment variables manually.
Python Decouple will retrieve the values the same way it retrieves on a local environment.
After creating the .env file and adding the environment variables, test your Django application to ensure it works fine.
Find more information on how to deploy Django on Ubuntu on AWS EC2 in this article.
Set up environment variables for Django website on cPanel / Shared hosting
When creating or after creating your Python application on cPanel, you have the option to add the environment variables under the Environment variables section.
In the environment variable section, you will find the ADD VARIABLE button that you will use to create environment variables for your Python Django application.

If you have already created your Python Django app, click the app to access its dashboard. At the bottom, you will find the Environment Variables section.
Press the ADD VARIABLE button and add the environment variables used in your Django application.
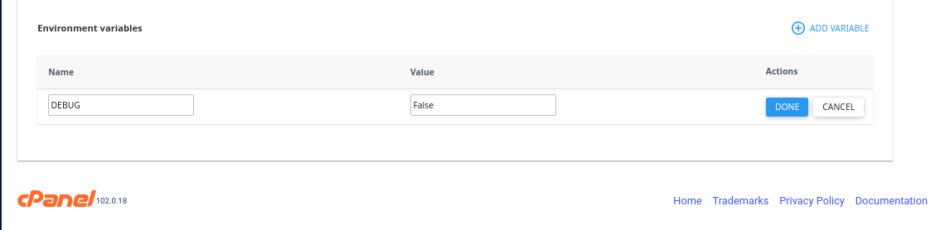
The same approach we used to configure the environment variables on Heroku is similar to Shared hosting.
After creating all the environment variables, press the SAVE button at the top to make the new changes reflect for your app.
Test your application by running python manage.py commands. The commands should run successfully.
Find more information on how to deploy Django websites on cPanel in this article: How to deploy Django on shared hosting.
That’s it for this tutorial.
I hope you can now set environment variables and use Python Decouple in your Python Django application in a development and production environment.
See you next time.

